Tenda AC15 CVE-2018-5767为例进行Fuzz测试 设备:Tenda AC15 路由器(可能包含其他系列路由器)
固件版本:<V15.03.05.18
固件下载地址:官网已挂,在此网站 内能找到,US_AC15V1.0BR_V15.03.1.16_multi_TD01.rar
0x01 漏洞分析 漏洞存在于 httpd 文件中,首先使用 binwalk 工具解压固件,漏洞文件路径为:squashfs-root/bin/httpd
使用file查看文件信息:
1
2
$ file ./bin/httpd ./bin/httpd: ELF 32-bit LSB executable, ARM, EABI5 version 1 (SYSV), dynamically linked, interpreter /lib/ld-uClibc.so.0, stripped
看到文件是 ARM 架构,32位 LSB字节序,已经剥离符号信息。
虽然该 bianry 被剥离了符号信息,没有符号表,我们看不到详细的函数信息,但是仍然能够看到部分函数名,这些名称往往是外部库函数或者是开源代码。
从 IDA 中函数窗口看到的函数名信息可以推断出 httpd 使用了 Goahead 这个 web server。(这个推断就需要经验的积累,知道每个框架里的函数名是什么样子的)
Goahead 会根据不同的 url 来决定由哪个函数进行 httpd 报文的处理。
查看 Goahead 相近版本2.5(固件中为2.3)的源码 ,根据参考博客 wp 是真正传入的待处理的数据,是一个结构体,非常重要!
这里又学到一个知识,IDA 会把结构体识别为数组,因此在反汇编代码中,往往找不到各个元素的定义。我们需要将相关结构体添加到 IDA 中。
在 IDA 中导入C语言声明的结构体方法:
在 View->Open Subviews->Local Types中可以看到本地已有的结构体,右击insert可以添加C语言声明的结构体
对于 AC15 httpd ,进一步分析wp入参的定义,添加以下两个结构体
1
2
3
4
5
6
7
8
9
struct ringq_t { unsigned char *buf; unsigned char *servp; unsigned char *endp; unsigned char *endbuf; int buflen; int maxsize; int increment; }
1
2
3
4
5
6
7
8
9
10
11
12
13
14
15
16
17
18
19
20
21
22
23
24
25
26
27
28
29
30
31
32
33
34
35
36
37
struct websRec { ringq_t header; __time_t since; char * cgiVars; char * cgiQuery; __time_t timestamp; int timeout; char ipaddr[32 ]; char type[64 ]; char *dir; char *path; char *url; char *host; char *lpath; char *query; char *decodedQuery; char *authType; char *password; char *userName; char *cookie; char *userAgent; char *protocol; char *protoVersion; int sid; int listenSid; int port; int state; int flags; int code; int clen; int wid; char *cgiStdin; int docfd; int numbytes; int written; void (*writeSocket)(struct websRec *wp); }
漏洞位置: 漏洞位于 R7WebsSecurityHandler 函数中。
注:此文的目的是来熟悉 boofuzz 工具对物联网固件中协议程序的测试流程,暂不介绍如何发现漏洞等。
在函数 sub_2D3F0 中,发现有回调函数注册,这里有一个名称有点奇怪的函数 R7WebsSecurityHandler ,应该是开发者自己开发实现的一个函数。
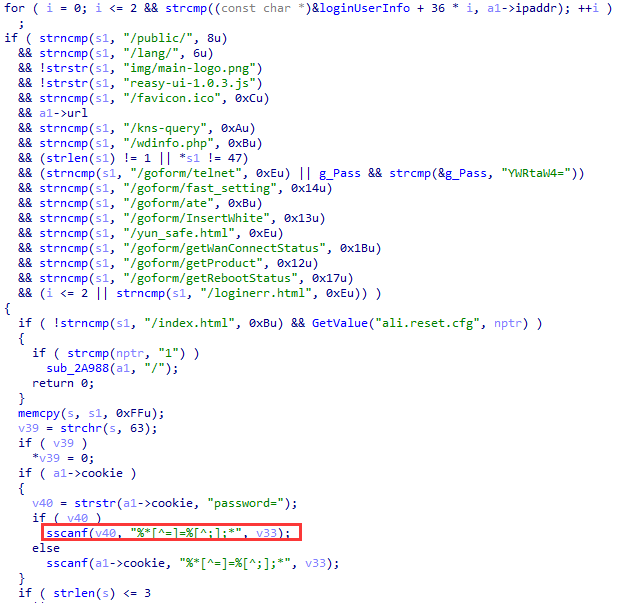
双击进入该函数定义,并修改参数 a1 为结构体 websRec,修改完后可以看到下边的漏洞点处:
可以看到,sscanf 函数会从 cookie 字段读取 password 的值,并复制到变量 v33 中,由于 sscanf 没有对复制的长度做检查,从而导致栈溢出。
0x02 仿真环境搭建 绕过判断条件 使用以下命令来对 httpd 程序仿真执行,首先进入到固件文件系统 squashfs-root 目录下:
1
2
$ cp $(which qemu-arm-static) ./$ sudo chroot . ./qemu-arm-static ./bin/httpd
这里需要注意的是,我们需要将对应架构的 qemu 程序复制到文件系统目录下,并使用 chroot . 命令来修改根路径。qemu-arm -L ./ 也可以达到相同的作用。
尝试运行后,程序会卡在如下界面:
1
2
3
4
5
6
7
8
9
10
11
12
13
$ sudo chroot . ./qemu-arm-static ./bin/httpd [sudo] guoxb 的密码: init_core_dump 1784: rlim_cur = 0, rlim_max = -1 init_core_dump 1794: open core dump success init_core_dump 1803: rlim_cur = 5120, rlim_max = 5120 Yes: ****** WeLoveLinux****** Welcome to ...
分析 httpd 的反汇编代码,通过定位字符串 “Welcome to …” ,可以看到位于 sub_2CEA8 函数内,在函数入口处发现调用了 check_network 外部函数,该函数如果返回值为0,则一直处于睡眠状态。
1
2
3
4
5
6
7
8
9
10
11
12
13
14
15
puts("\n\nYes:\n\n ****** WeLoveLinux****** \n\n Welcome to ..."); sub_2F04C(); while ( check_network(v17) <= 0 ) // 如果验证不通过,就会循环sleep,卡死 sleep(1u); v1 = sleep(1u); if ( ConnectCfm(v1) ) { ... } else // ConnectCfm不通过,也会报错退出 { printf("connect cfm failed!"); v2 = 0; } return v2;
比较快捷的方法是对 httpd 程序打 patch,直接绕过判断条件,将 R0 修改为 1 即可绕过。
对 binary 打 patch,不太复杂可以直接通过 hexedit 工具来手工打 patch。修改完运行后,会出现如下报错:
1
2
3
4
5
6
7
8
9
10
11
12
13
14
$ sudo chroot . ./qemu-arm-static ./bin/httpd init_core_dump 1784: rlim_cur = 0, rlim_max = -1 init_core_dump 1794: open core dump success init_core_dump 1803: rlim_cur = 5120, rlim_max = 5120 Yes: ****** WeLoveLinux****** Welcome to ... connect: No such file or directory Connect to server failed. connect cfm failed!
通过分析代码,可以看到是由于 if ConnectCfm(v1) 处判断未通过导致的,同样,直接对判断条件打 patch。
对于修改后的汇编代码是什么样,可以直接通过 IDA 打patch后查看,也可以通过该网站 来在线汇编查看。
打过 patch 后再次运行,可以看到如下:
1
2
3
4
5
[httpd][debug]----------------------------webs.c,157 Unsupported setsockopt level=1 optname=13 httpd listen ip = 255.255.255.255 port = 80 webs: Listening for HTTP requests at address 244.246.254.255
可以明显看到监听的 IP 地址很奇怪,这里是因为没有获取到网卡信息,导致得到了一个随机的 IP 地址,虽然我们成功跑起来了进程,但是还没办法通过宿主机的网卡连接到 httpd。
修复网卡配置信息 回到 check_network 函数,这是一个外部函数,定义在 libcommon.so 中。这个是如何找到的呢?可以通过之前编写的小工具 searchstring.sh 来搜索文件系统中每个文件中的字符串来查找包含 check_network 的文件,如下:
1
2
3
4
5
6
7
8
9
$ bash ./stringsearch.sh check_network Found "check_network" in file: ./bin/httpd Found "check_network" in file: ./bin/httpd-new Found "check_network" in file: ./bin/logserver Found "check_network" in file: ./bin/multiWAN Found "check_network" in file: ./bin/netctrl Found "check_network" in file: ./bin/tendaupload Found "check_network" in file: ./lib/libcommon.so Found "check_network" in file: ./usr/sbin/UsbIppCheck
可以看到第 8 行,check_network 存在于 libcommon.so 库文件中。
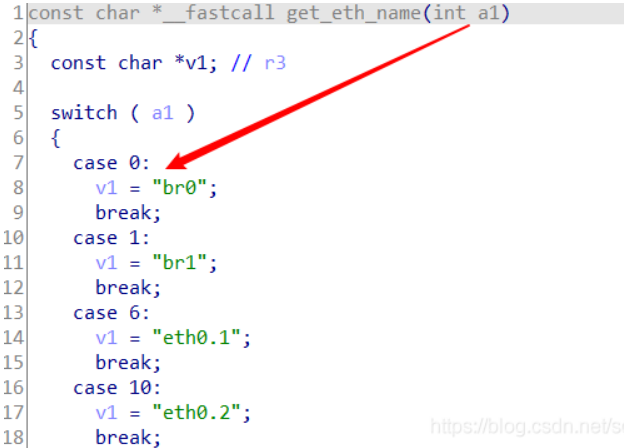
继续分析可以发现如下函数调用链:check_network->getLanIfName()->get_eth_name(0)
其中,get_eth_name 函数也是外部函数,同样用脚本分析,可以发现其位于 libChipApi.so 中:
参数 a1 为 0,故路由器守护进程 httpd 想要获取的网卡名为 “br0”,直接在宿主机上创建一个该名称的网卡:
1
2
sudo tunctl -t br0 -u $(whoami) sudo ifconfig br0 192.168.65.1/24
再次运行,即可看到该进程已经成功获取到网卡的 IP 地址:
0x03 boofuzz来验证漏洞 boofuzz 安装 推荐在虚拟环境中安装运行 boofuzz :
1
2
3
4
5
6
7
$ sudo apt-get install python3-pip python3-venv build-essential $ mkdir boofuzz && cd boofuzz$ python3 -m venv env $ source env /bin/activate(env) $ pip install -U pip setuptools (env) $ pip install boofuzz $ alias python_boofuzz='[env_path]/bin/python'
定制 boofuzz 脚本 根据该报文信息来定制脚本,如下,通过上面的分析,我们主要对 cookie 字段进行fuzz。
1
2
3
4
5
6
7
8
9
10
11
12
13
14
15
16
17
18
19
20
21
22
23
24
25
26
27
28
29
30
31
32
33
34
35
36
37
38
39
40
41
42
43
44
45
46
47
48
49
50
51
52
53
54
55
56
57
58
59
60
61
62
63
64
65
66
67
68
69
70
71
72
73
74
75
76
77
78
79
80
81
82
83
84
85
86
from boofuzz import *IP = "192.168.65.1" PORT = 80 def check_response (target, fuzz_data_logger, session, *args, **kwargs ): fuzz_data_logger.log_info("Checking test case response..." ) try : response = target.recv(512 ) except : fuzz_data_logger.log_fail("Unable to connect to target. Closing..." ) target.close() return if not response: fuzz_data_logger.log_fail("Empty response, target may be hung. Closing..." ) target.close() return fuzz_data_logger.log_info("response check...\n" + response.decode()) target.close() return def main (): ''' options = { "start_commands": [ "sudo chroot /home/lys/Documents/IoT/firmware/_AC15_V15.03.1.16.bin.extracted/squashfs-root ./httpd" ], "stop_commands": ["echo stopping"], "proc_name": ["/usr/bin/qemu-arm-static ./httpd"] } procmon = ProcessMonitor("127.0.0.1", 26002) procmon.set_options(**options) ''' session = Session( target=Target( connection=SocketConnection(IP, PORT, proto="tcp" ), ), post_test_case_callbacks=[check_response], ) s_initialize(name="Request" ) with s_block("Request-Line" ): s_group("Method" , ["GET" ]) s_delim(" " , fuzzable=False , name="space-1-1" ) s_string("/goform/123" , fuzzable=False ) s_delim(" " , fuzzable=False , name="space-1-2" ) s_static("HTTP/1.1" , name="HTTP_VERSION" ) s_static("\r\n" , name="Request-Line-CRLF-1" ) s_static("Host" ) s_delim(": " , fuzzable=False , name="space-2-1" ) s_string("192.168.0.5" , fuzzable=False , name="IP address" ) s_static("\r\n" , name="Request-Line-CRLF-2" ) s_static("Connection" ) s_delim(": " , fuzzable=False , name="space-3-1" ) s_string("keep-alive" , fuzzable=False , name="Connection state" ) s_static("\r\n" , name="Request-Line-CRLF-3" ) s_static("Cookie" ) s_delim(": " , fuzzable=False , name="space-4-1" ) s_string("bLanguage" , fuzzable=False , name="key-bLanguage" ) s_delim("=" , fuzzable=False ) s_string("en" , fuzzable=False , name="value-bLanguage" ) s_delim("; " , fuzzable=False ) s_string("password" , fuzzable=False , name="key-password" ) s_delim("=" , fuzzable=False ) s_string("ce24124987jfjekfjlasfdjmeiruw398r" , fuzzable=True ) s_static("\r\n" , name="Request-Line-CRLF-4" ) s_static("\r\n" ) s_static("\r\n" ) session.connect(s_get("Request" )) session.fuzz() if __name__ == "__main__" : main()
我们可以看到发现了错误。也可以通过本地地址 http://localhost:26000来查看fuzz情况。
0x04 参考博客 本文目的只是了解boofuzz对IoT中协议软件做fuzz流程,并不针对具体漏洞做详细分析及利用,其他相关内容具体可参考下面博客。
https://p1kk.github.io/2021/03/29/iot/Tenda%20AC15%20CVE-2018-5767%20CVE-2020-10987/
https://blog.csdn.net/song_lee/article/details/113800058